
See APIblaze on a real app, in about a minute
ResiResi is a small table-booking app for two pizzerias, Nino Pizza and Gino Pizza. One command runs it on your laptop and puts APIblaze in front of it: a public address, an MCP address for AI assistants, an API key per pizzeria, sign-in, and rules about who can change what. No account, nothing to install.
$ npx apiblaze@latest demoRun it
In any empty folder. It needs Node 18 or later, and nothing else.
npx apiblaze@latest demoIt writes the app to ./apiblaze-demo, then asks before each step, so you can see what each one does. An AI assistant runs it without questions. The whole run takes about 40 seconds, and everything stays on your laptop except the public address APIblaze gives it.
1 · The app on its own
A plain backend with four routes, before APIblaze.
1. The app: ResiResi, a table booking app for Tenants (Nino and Gino Pizzas)
   to allow end-users to book tables in their restaurants   (no APIblaze yet)
   Written to apiblaze-demo. Its routes, from openapi.yaml:
     GET    /reservations        List my bookings
     POST   /reservations        Book a table
     GET    /reservations/{id}   Get one booking
     DELETE /reservations/{id}   Cancel a booking
   No login, no API keys, no permission checks in its code.
   It only checks one shared backend secret (in .env.local).

? Ok to serve the backend on localhost:3001? (Y/n)

   $ cd apiblaze-demo && npm run start   npm run stop · npm run restart
   ✓ Reservation backend: localhost:3001   unprotected
   ✓ Unprotected reservation front-end, going directly to the reservation backend:
     http://localhost:3002
The backend has no login, no API keys and no permission checks. It trusts two headers to know which pizzeria and which person is calling, and it answers only callers that send a shared backend secret. Two things run on your laptop now: the backend, and an unprotected front-end that calls it directly.
2 · APIblaze in front
It asks “Ok to put an APIblaze proxy and MCP in front of the reservation backend?”, then sets up all of this. Each piece is also a command you can run on its own.
✓Proxydemobraveotter83e7, created in 10.9 s with no account.
npx apiblaze@latest create --target ./openapi.yaml --name demobraveotter83e7 --tenant ninopizza5f44 --auto✓Customers / tenantsNino Pizza and Gino Pizza: two customers of the same app, each with its own API key.
npx apiblaze@latest tenant create --name "Gino Pizza" --slug ginopizza96f4npx apiblaze@latest tenant attach demobraveotter83e7 --tenant ginopizza96f4✓AdminsAna runs Nino Pizza and Gina runs Gino Pizza. Admins are added by email, even before they sign in.
npx apiblaze@latest admins add ana@ninopizza.example --tenant ninopizza5f44npx apiblaze@latest admins add gina@ginopizza.example --tenant ginopizza96f4✓RulesRead from the spec: only the person who made a reservation can change or cancel it.
npx apiblaze@latest rule demobraveotter83e7 "Only the person who made a reservation can change or cancel it"✓AI (MCP tools)One tool per route, so AI assistants can use the app.
Part of create, above.
✓Limits2 calls a second per customer.
npx apiblaze@latest limits set demobraveotter83e7 --rate 2 --end-user-rate 2✓Backend secretAdded to every call APIblaze forwards, so the backend stays private.
npx apiblaze@latest transform demobraveotter83e7 set-header x-target-api-key --value-env BACKEND_SECRET --secret✓KeysSaved to .env.local, never printed.
npx apiblaze@latest apikeys mint --tenant ninopizza5f44 --backend --env devnpx apiblaze@latest apikeys mint --tenant ginopizza96f4 --backend --env devNo account is needed. The proxy lives in an anonymous workspace for 30 days, unless you claim it.
3 · Live on the internet
A tunnel connects the public address to the backend on your laptop.
? Ok to create a tunnel allowing demobraveotter83e7 to forward requests
  to localhost:3001? (Y/n)

3. Live on the internet
   $ npx apiblaze@latest dev --port 3001 --project demobraveotter83e7 --auto
   ✓ Tunnel: the public address reaches localhost:3001 on this laptop
     Public API  https://demobraveotter83e7.tryabz.run/1.0.0/dev
     MCP         https://demobraveotter83e7-ninopizza5f44.mcp.tryabz.run/1.0.0/dev
     Dev portal  https://ninopizza5f44.portal.apiblaze.com/1.0.0
The public API reaches localhost:3001 through the tunnel. The MCP address is what you paste into Claude, ChatGPT or Cursor. Each pizzeria gets its own MCP address and its own developer portal, where people sign in and get a key.
4 · The protected website
The same booking app, now calling the public API instead of the backend.
? Ok to launch the protected website, which will use the proxy to reach the backend? (Y/n)

4. The protected website, through APIblaze
   $ cd apiblaze-demo && npm run restart   picks up the keys in .env.local
   ✓ Protected reservation website, going through the APIblaze proxy: http://localhost:3000
   ✓ Unprotected reservation front-end, still going directly to the backend:
     http://localhost:3002
Open http://localhost:3000. The switch at the top goes between this protected website and the unprotected one. Below it are the API, MCP and developer portal addresses, each with a copy button. Pick a pizzeria and who you are signed in as, then book a table.
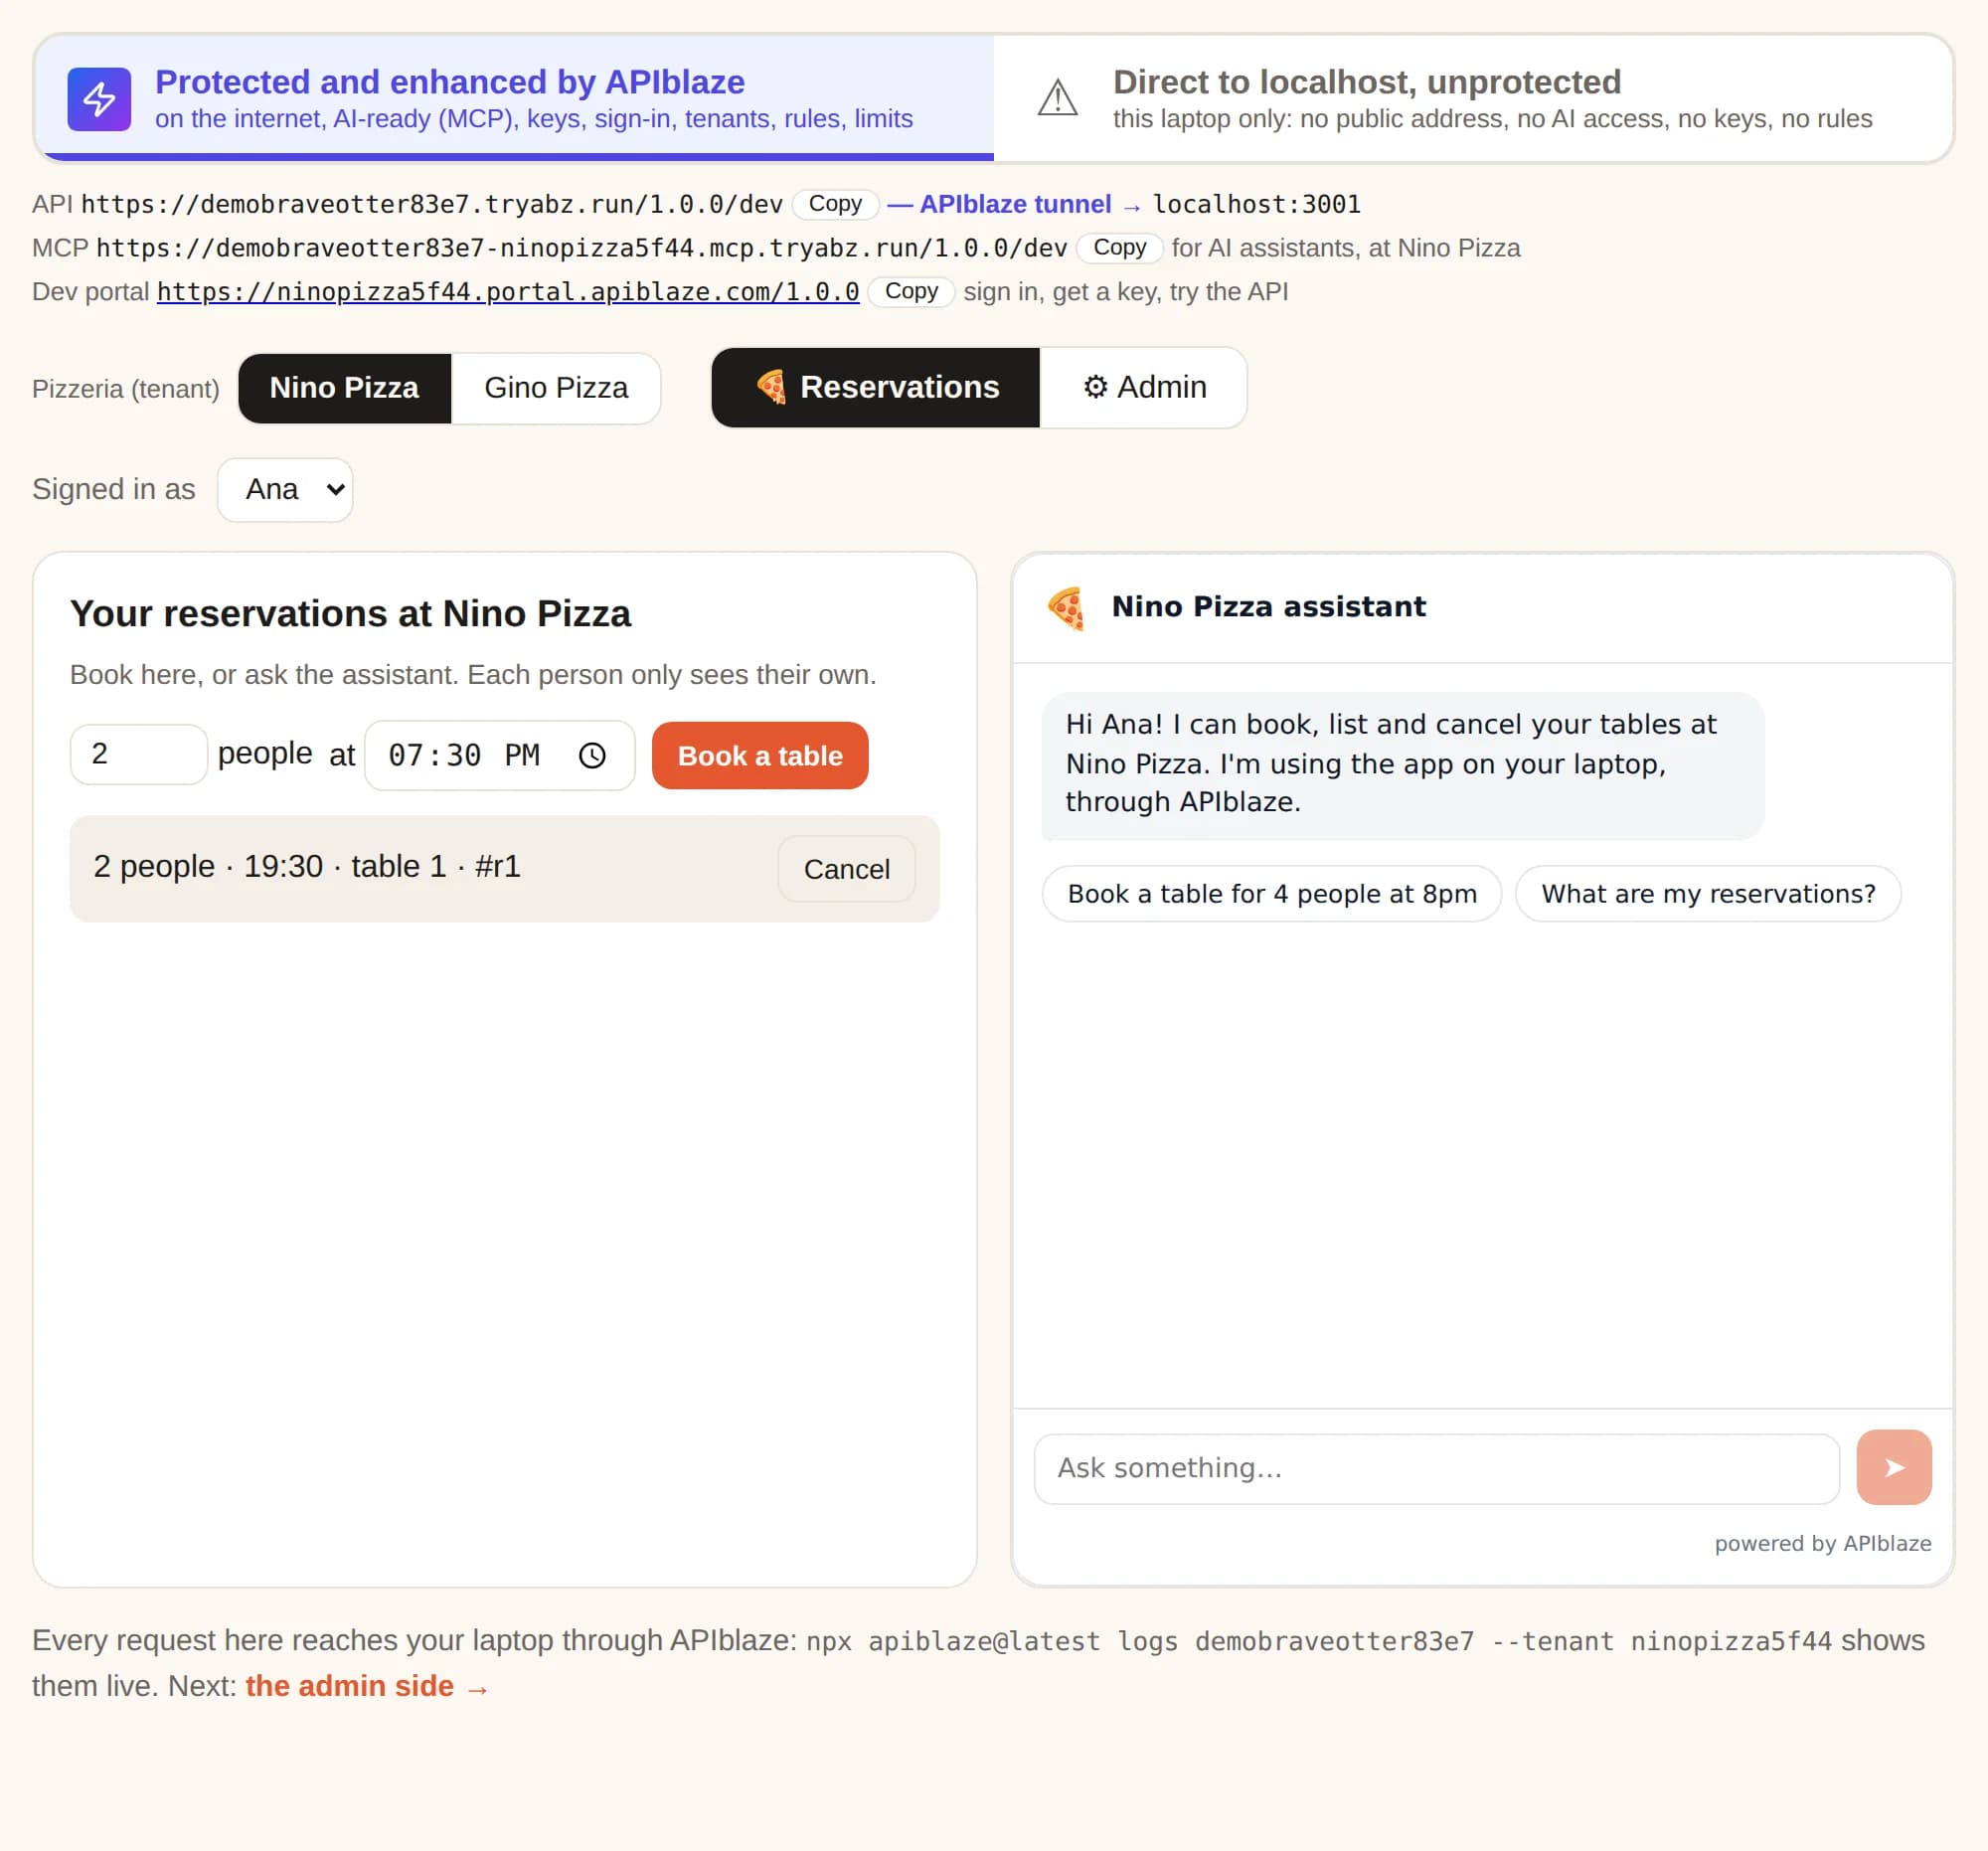
The website sends each call to the public API with Nino Pizza's key, and says which person it is for. APIblaze checks the key, applies the rules, and forwards the call to your laptop.
Ask the assistant
A real AI assistant, using the app through APIblaze's MCP tools.
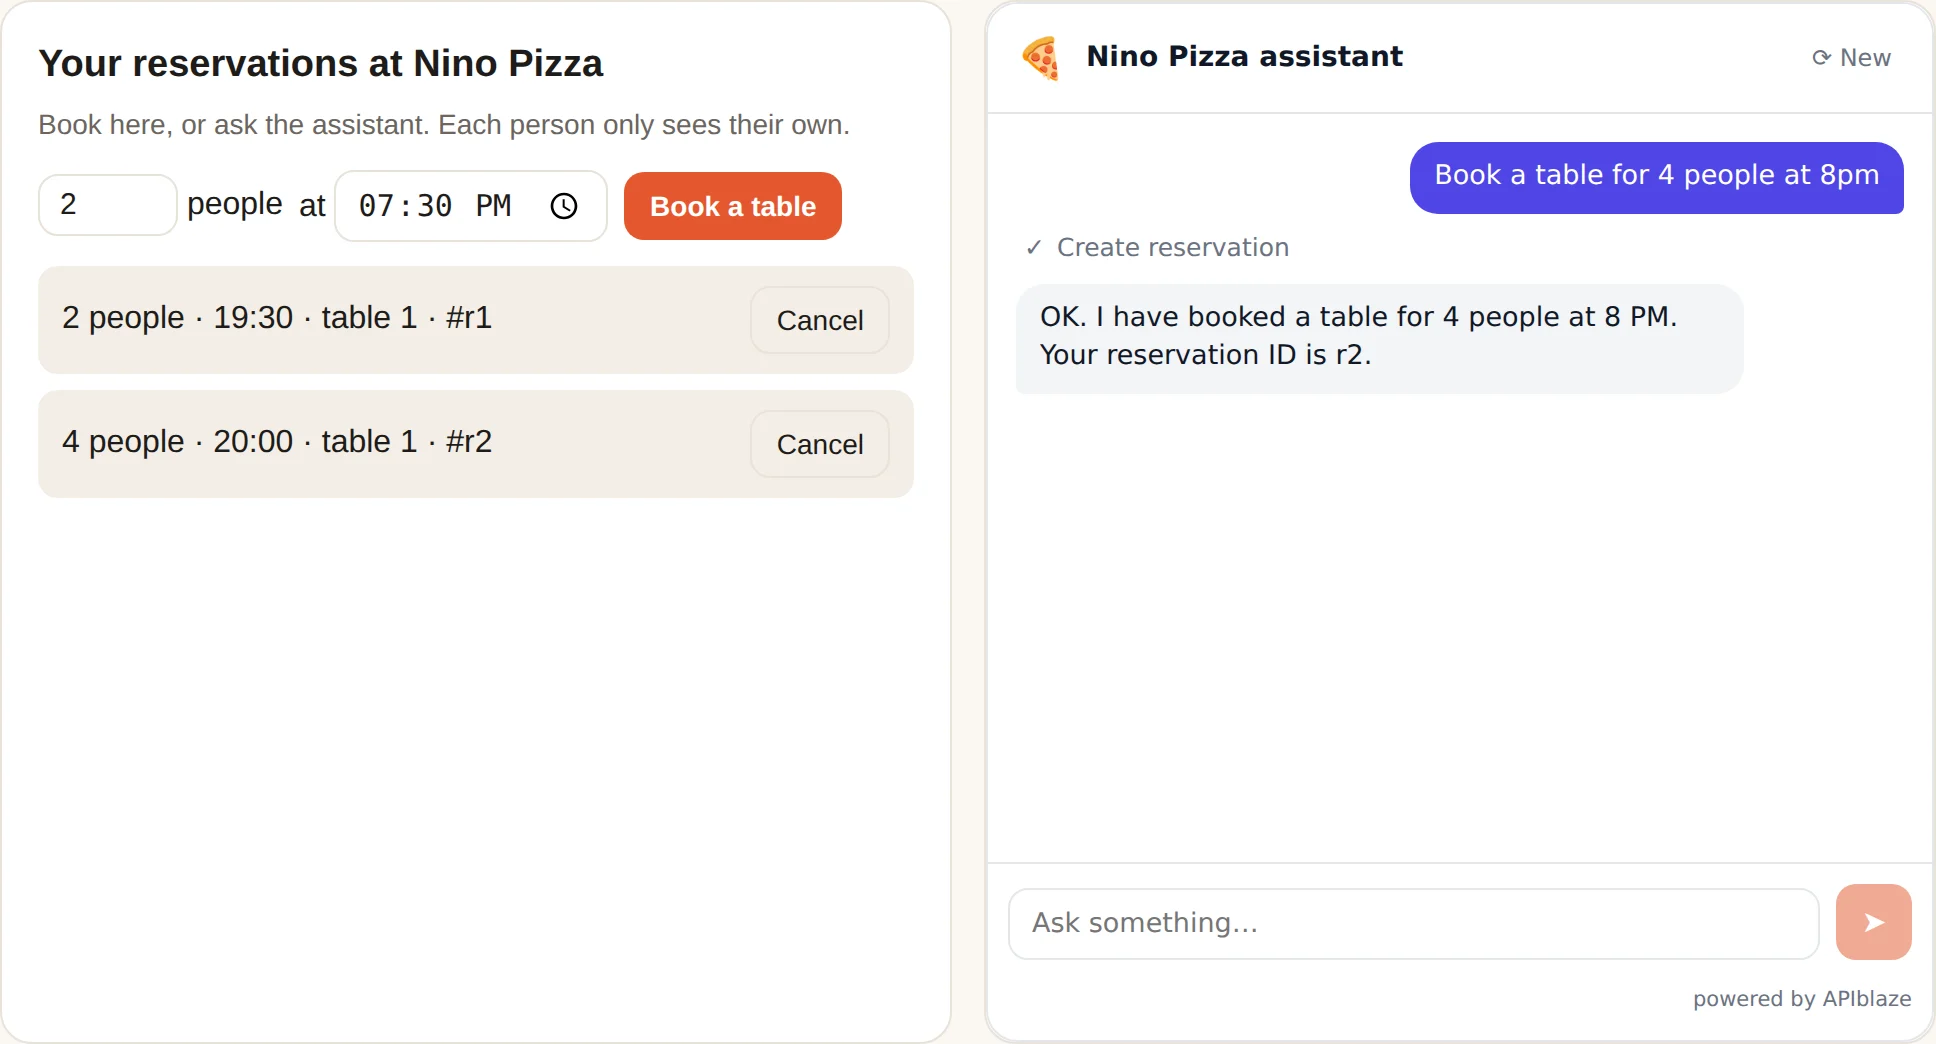
The assistant only reaches the app through APIblaze. It picks the right tool, here Create reservation, and acts as the person signed in, so the booking is Ana's and shows in her list. The restaurant picks the table, so it never asks for one.
Nobody touches what isn’t theirs
Sign in as Ben and try to cancel Ana's booking.
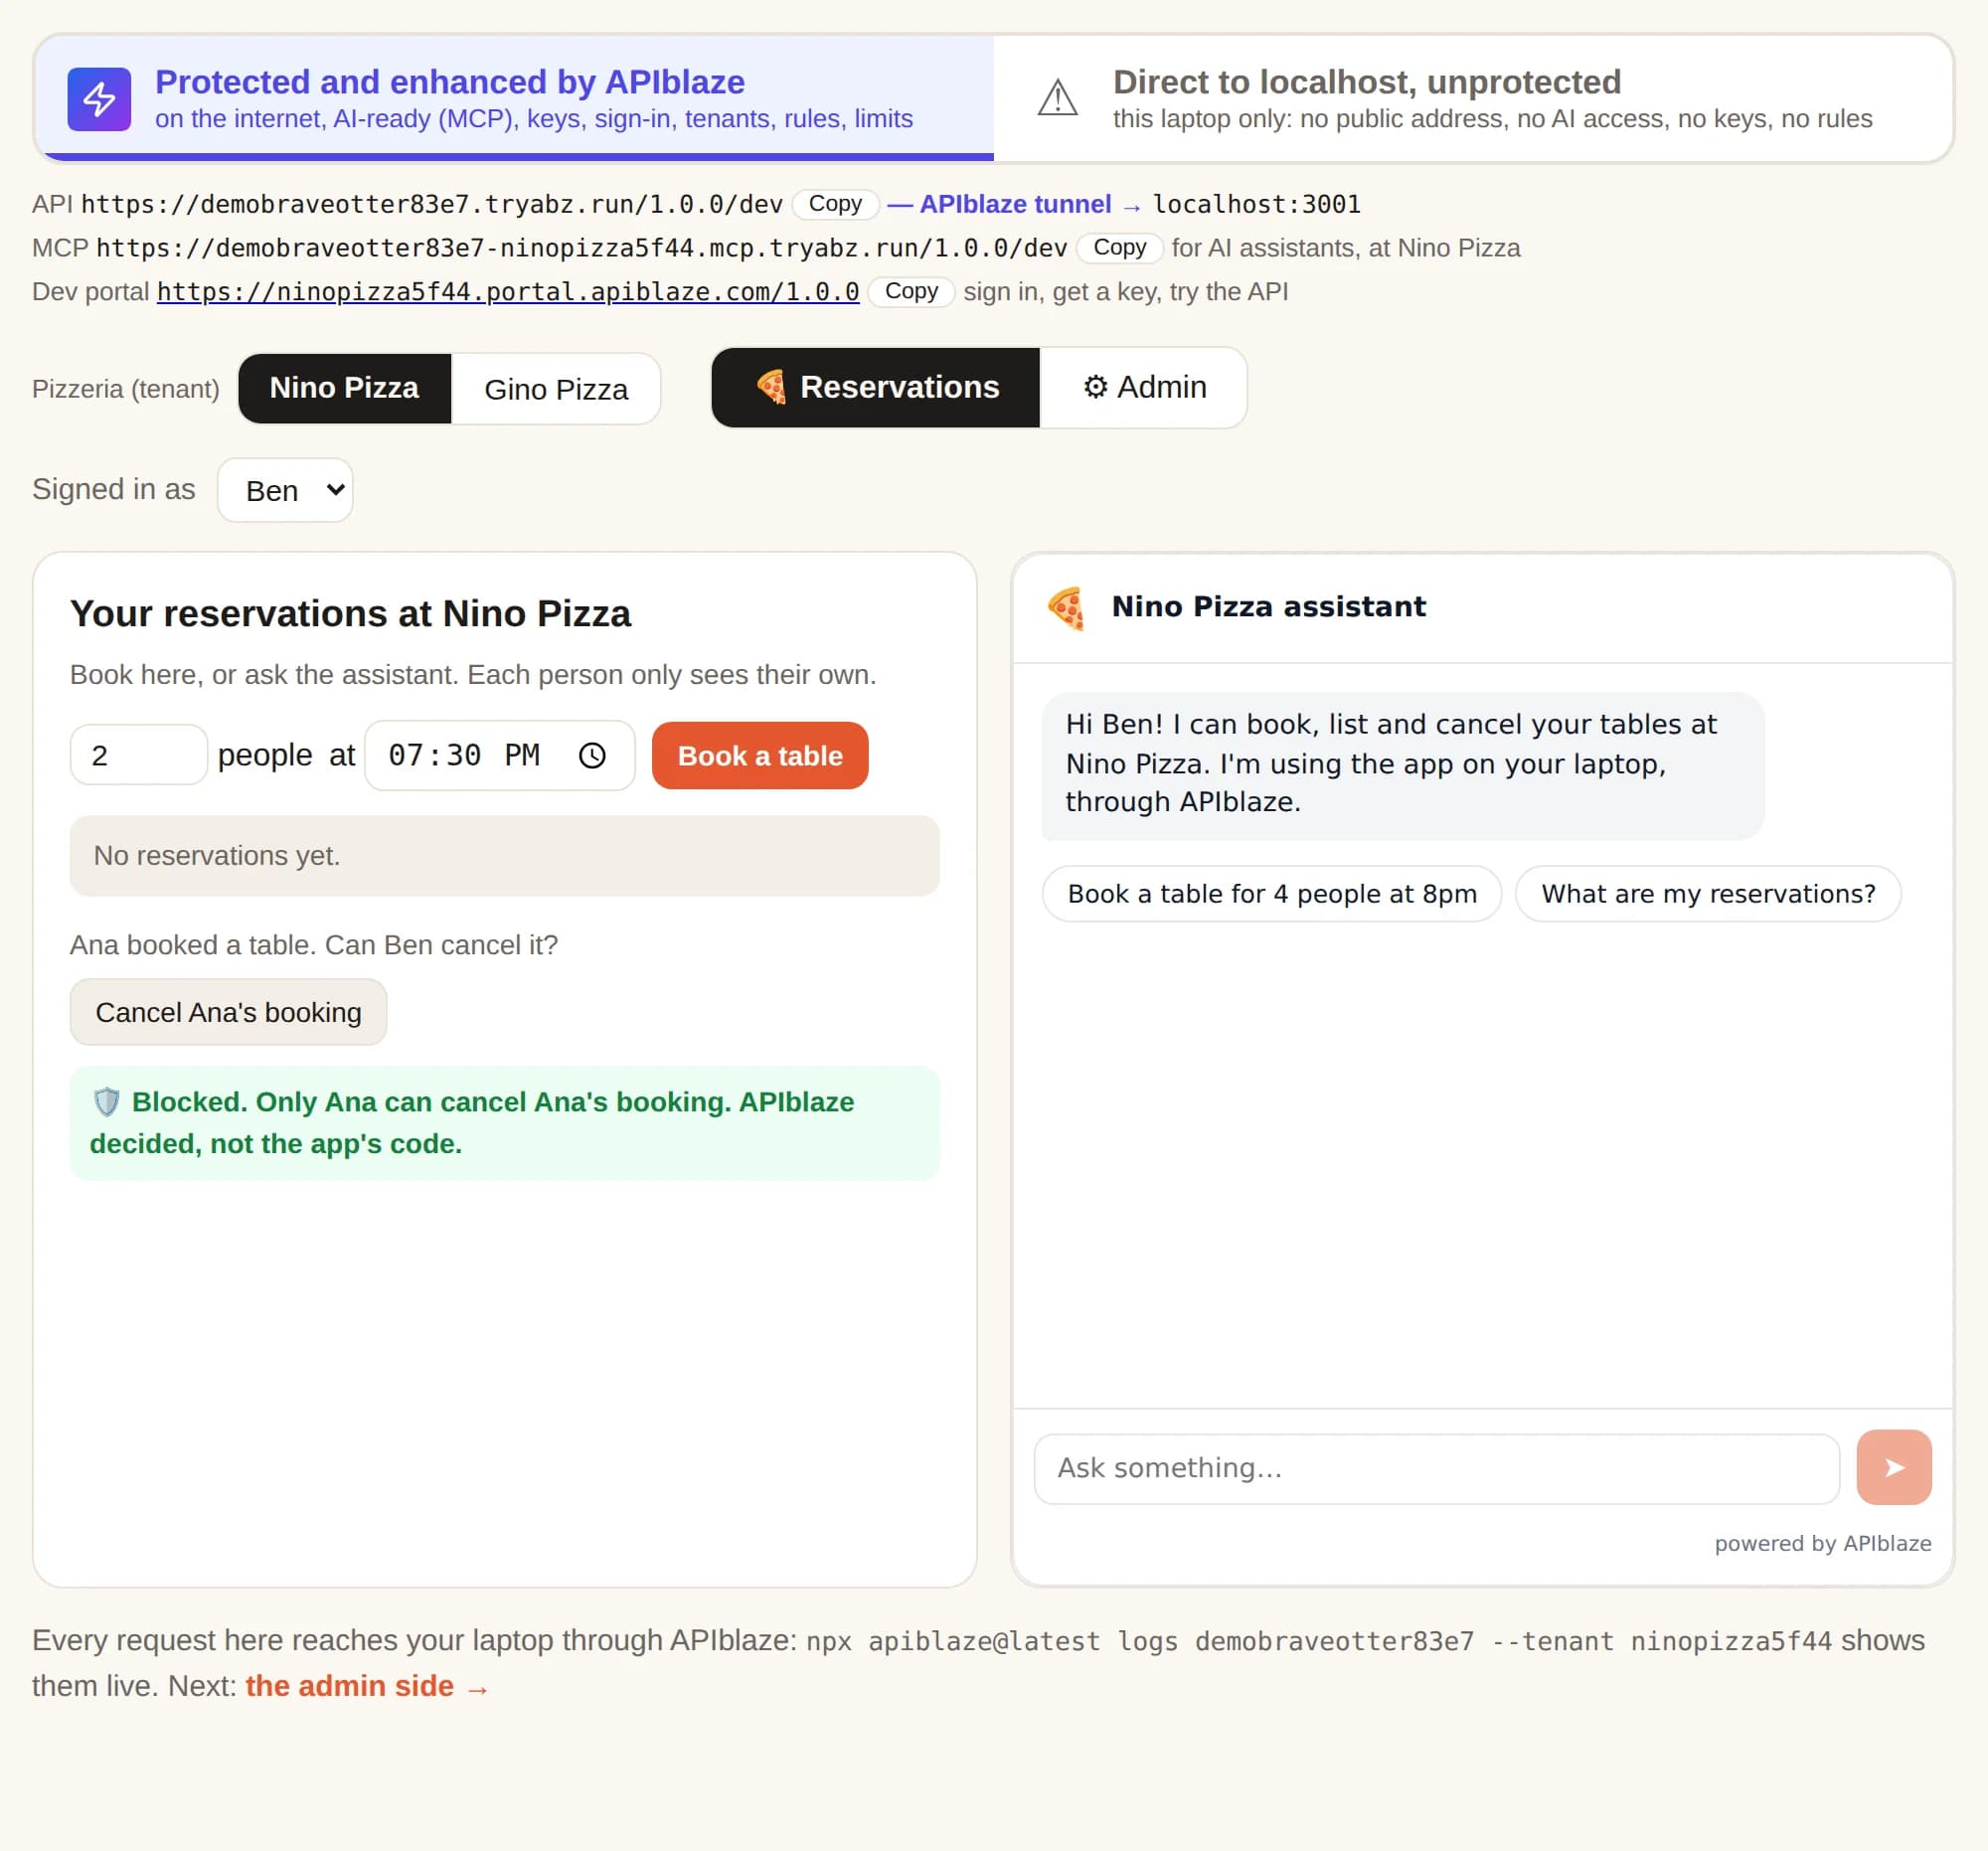
Ben sees none of Ana's bookings, and when he tries to cancel hers, APIblaze refuses before the call reaches your laptop. The rule came from the spec. The backend has no permission code at all.
The same app, unprotected
Flip the switch to Direct to localhost and do the same thing.
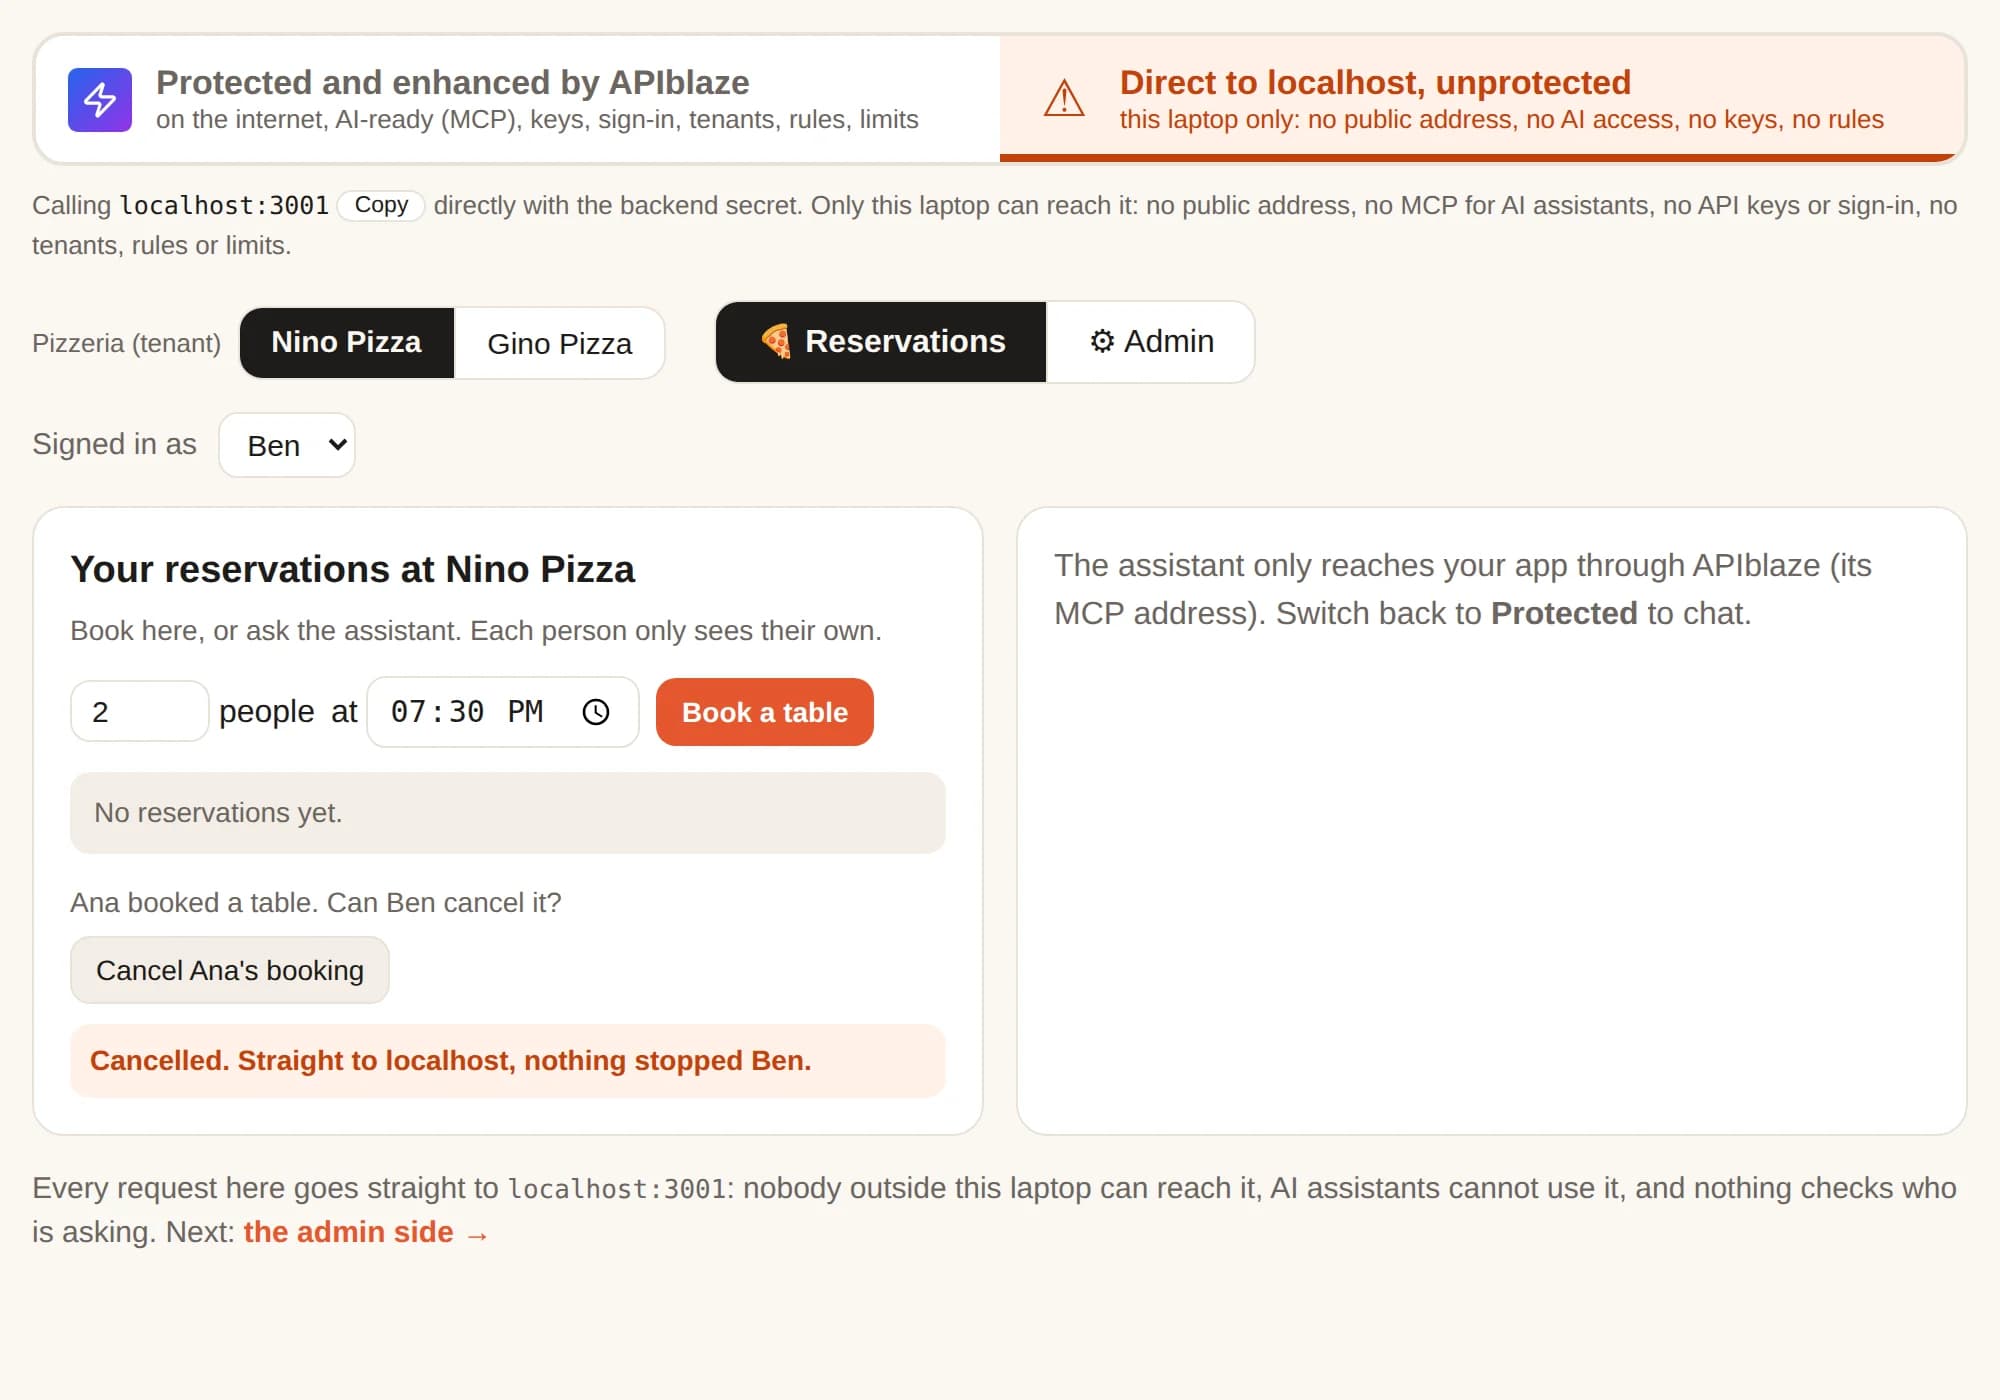
The same click goes straight to the backend with the shared secret, and nothing stops Ben. This front-end has no public address, no MCP for AI assistants, no API keys or sign-in, and no rules. That is how most apps ship.
Two pizzerias, kept apart
Switch to Gino Pizza.
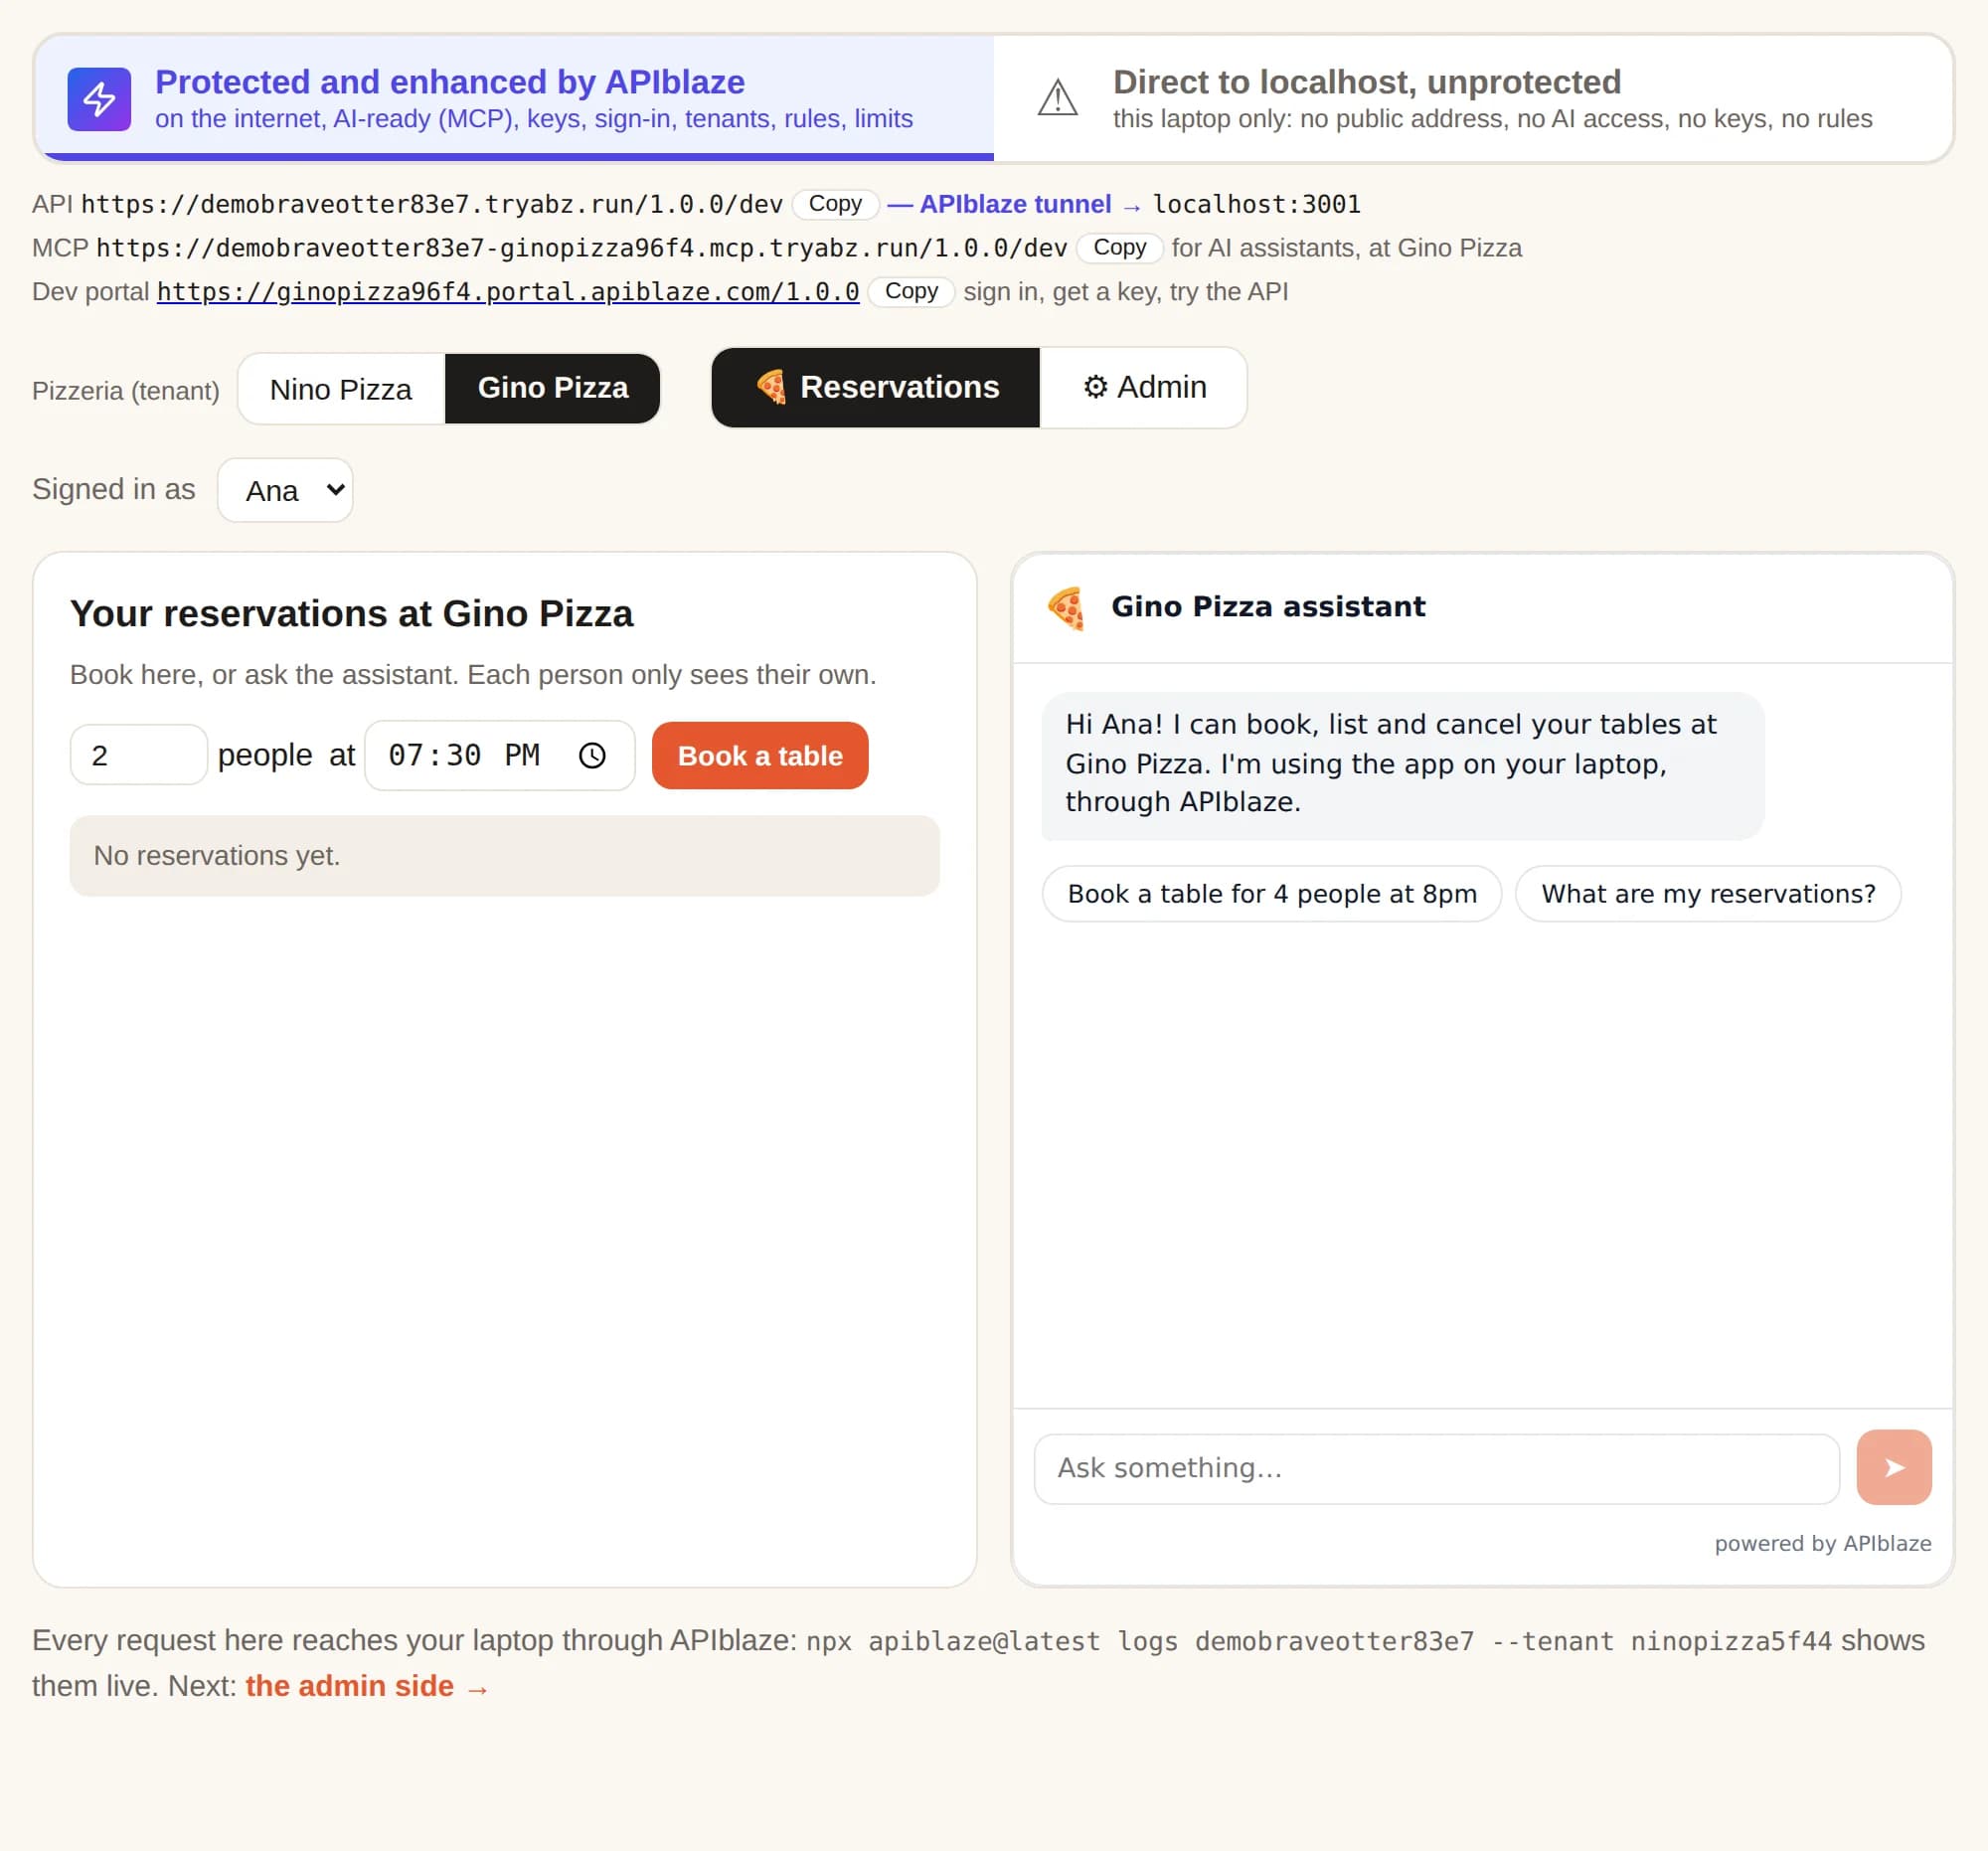
Gino Pizza is another tenant, with its own API key, MCP address, developer portal and bookings. Ana's Nino Pizza reservations are not here, and Gino Pizza's key cannot open them.
The admin side
What each pizzeria's admin gets, built from APIblaze's widgets.
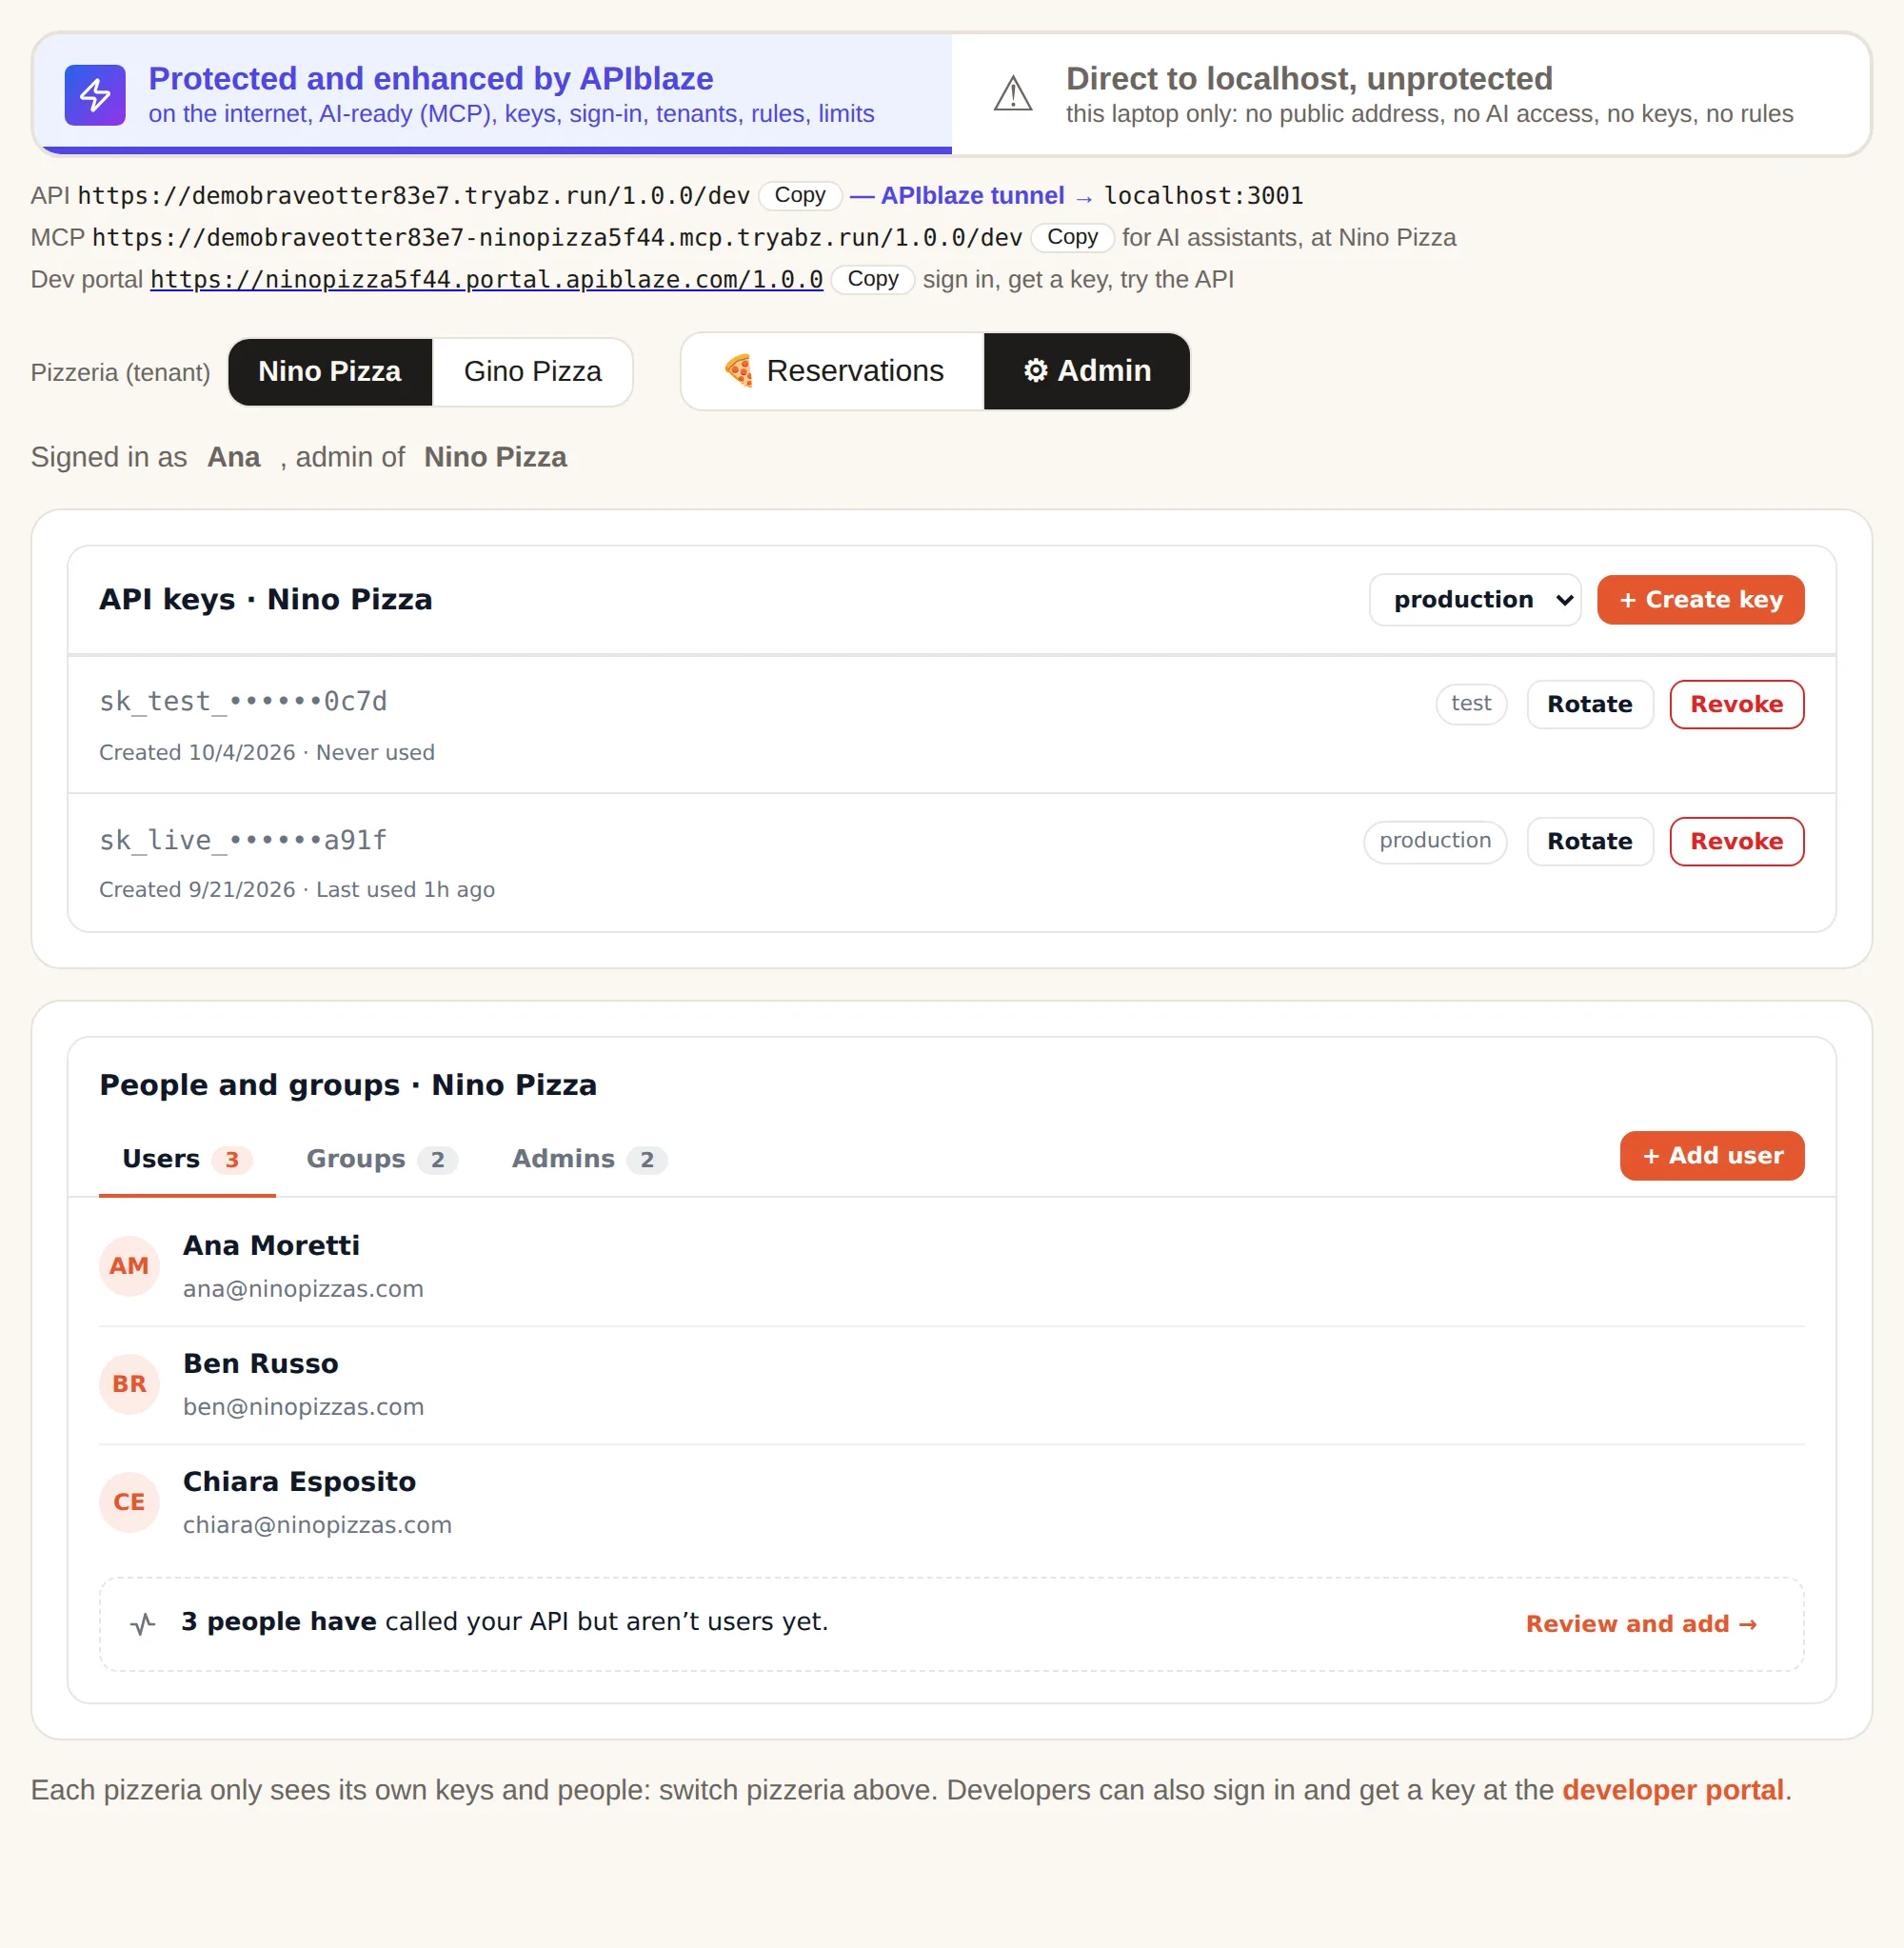
- API keys: each customer creates and revokes their own keys, scoped to their pizzeria.
- People and groups: three tabs: users (with the people seen in your API traffic one click away in Add user), groups, and admins, added by email.
These are the same widgets you can put on your own site. See widgets.
Logs, stop and start
The tunnel and the app start and stop separately.
# the requests reaching APIblaze, live
npx apiblaze logs demobraveotter83e7 --tenant ninopizza5f44

# the tunnel only: same addresses and keys when it starts again
npx apiblaze@latest demo stop
npx apiblaze@latest demo start

# the app only, no APIblaze involved
cd apiblaze-demo && npm run stop
cd apiblaze-demo && npm run start
Running npx apiblaze@latest demo again stops every earlier demo and starts a fresh one.
Your own backend
The same thing, for the app you already have.
npx apiblaze dev --port 3000Or ask your AI assistant, from your project: “Show me what apiblaze can do for my backend using npx apiblaze@latest skills”. It finds your backend and offers to put it behind APIblaze. Read the docs for everything else.